Reference Topics
Warning
This page details the topics that are common to Chef Automate High Availability (HA) deployment models and aid you in deploying it in your network infrastructure.
IAM Users
AWS Identity and Access Management (IAM) is a web service that helps you securely control access to AWS resources. You use IAM to control who is authenticated (signed in) and authorized (has permissions) to use resources.
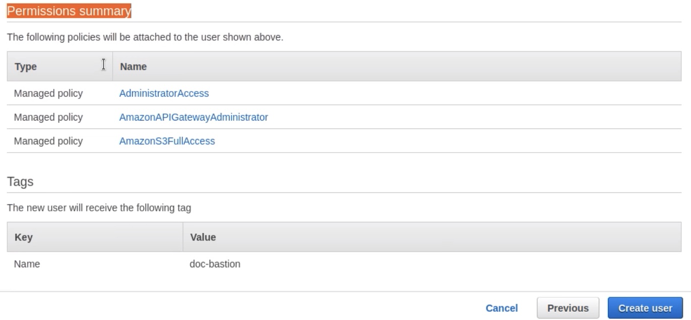
To run the terraform scripts, you need an IAM user with the following permissions:
- AdministratorAccess
- AmazonAPIGatewayAdministrator
- AmazonS3FullAccess
These permissions can either be directly added to the user or via IAM Group.
Note
Once we have an AWS account, we’ll need to create an IAM user to programmatically interact with it and to configure our AWS CLI (command-line interface). Amazon IAM enables you to manage users and user permissions in AWS. You can create one or more IAM users in your AWS account. You might create an IAM user for someone who needs access to your AWS console, or when you have a new application that needs to make API calls to AWS. This is to add an extra layer of security to your AWS account.
Creating an IAM User
- Navigate to your AWS account.
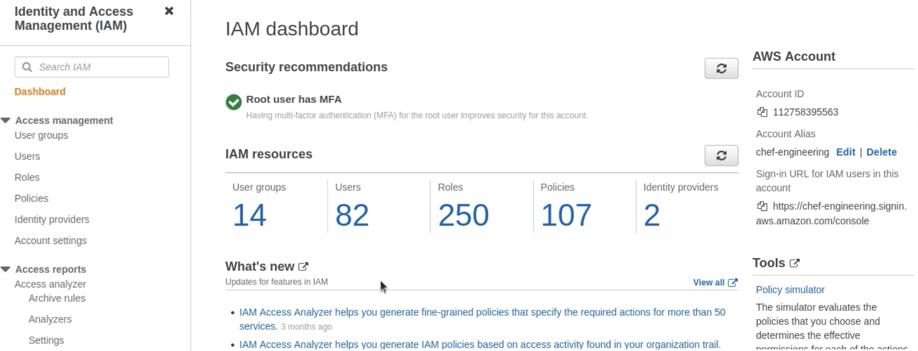
- Select IAM from the list of services from the AWS console. The IAM dashboard screen appears.
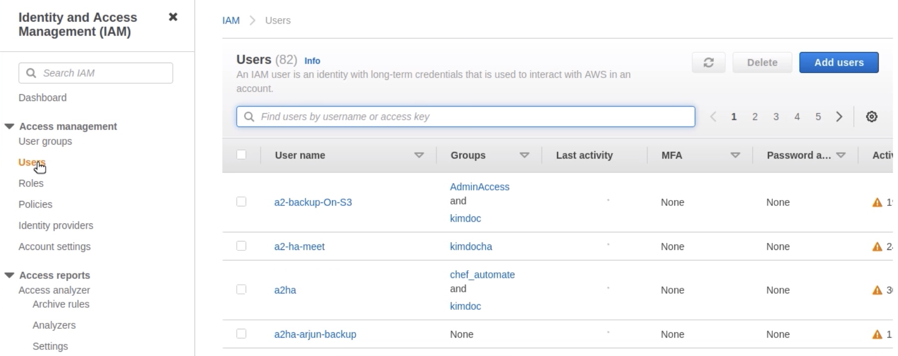
- Select Users from the Access management menu on the left.
- Select Add Users. The Set User Details screen appears.
- Type the user name for the new user and other necessary details.
- Check the Access key - Programmatic access box under Select AWS access type section.
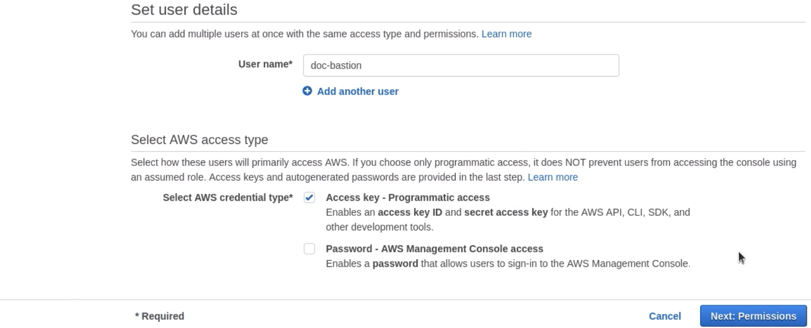
This is the sign-in name for AWS. If you want to add multiple users, choose to Add another user for each additional user and type their user names. You can add up to 10 users at one time.
This account will be used by your AWS CLI and will be connecting to the AWS API directly by not using the Management Console.
- Select Next: Permissions.
- Select Attach existing policies directly. Filter the policies by keyword: IAM. For this user, select IAMFullAccess from the list of available policies. The IAMFullAccess policy enables this user to create and manage user permissions in AWS.
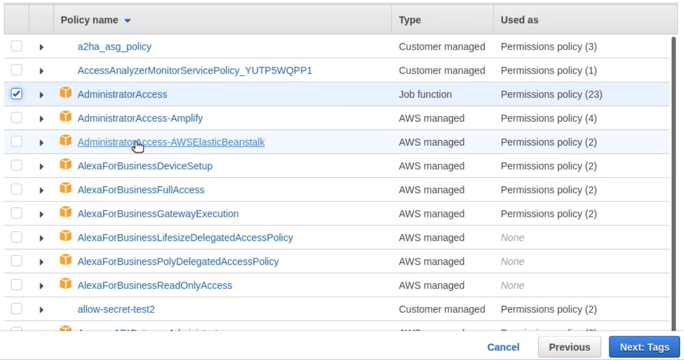
- Set the user permissions.
- Search for *AdministratorAccess and select the policy.
- Select Next: Tags.
- Provide key name and value as tagging for the user been created.
- Select Next: Review.
- Select Create user.
- Select show to reveal the secret access key.
- Download and save the Secret access key.
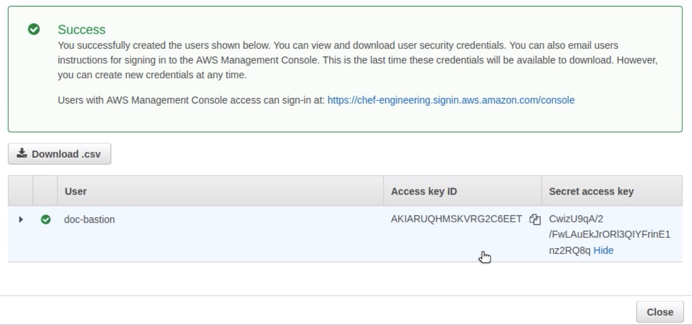
- Take a note of the Access key ID and Secret access key.
Now let’s configure our AWS CLI to deploy our applications from our command line.
Refer Creating an IAM User page for creating an IAM user through CLI and API methods.
Certificates
A security certificate is a small data file used as an Internet security technique through which the identity, authenticity and reliability of a website or Web application is established.
Certificates should be rotated periodically, to ensure optimal security.
How is Certificate Rotation Helpful?
Certificate rotation means the replacement of existing certificates with new ones when any certificate expires or based on your organization policy. A new CA authority is substituted for the old requiring a replacement of root certificate for the cluster.
The certificate rotation is also required when key for a node, client, or CA is compromised. Then, you need to modify the contents of a certificate, for example, to add another DNS name or the IP address of a load balancer through which a node can be reached. In this case, you would need to rotate only the node certificates.
How to Rotate the Certificates?
You can generate the required certificates on your own or you can use the existing certificates of your organization. Ensure you execute all the below commands from the cd /hab/a2_deploy_workspace path.
Follow these steps to rotate your certificates that are to be used in Chef Automate High Availability (HA):
- Navigate to your workspace folder. For example,
cd /hab/a2_deploy_workspace. - Type the command,
./scripts/credentials set ssl --rotate alland press Enter. This command rotates all the certificates of your organization.
Note
/hab/a2_deploy_workspace/certs location. You need to identify the appropriate certificates. For example, to rotate certificates for PostgreSQL, use certificate values into pg_ssl_private.key, pg_ssl_public.pem, and ca_root.pem. Likewise, to rotate certificates for ElasticSearch, use certificate values into ca_root.pem, es_admin_ssl_private.key, es_admin_ssl_public.pem, es_ssl_private.key, es_ssl_public.pem, kibana_ssl_private.key, kibana_ssl_public.pem.For rotating the PostgreSQL certificates, type the command
./scripts/credentials set ssl --pg-ssland press Enter. .For rotating the Elasticsearch certificates, type the command,
./scripts/credentials set ssl --es-ssland press Enter.
- If your organization issues certificate from an intermediate CA, then place the respective certificate after the server certificate as per order listed. For example, in
certs/pg_ssl_public.pem, paste it as them as listed:
- Server Certificate
- Intermediate CA Certificate 1
- Intermediate CA Certificate n
Type the command,
./scripts/credentials set ssl(with the appropriate options) and press Enter. This command deploys the nodes.Type the command,
./scripts/credentials set ssl --helpand press Enter. This command provides you information and list of commands related to certificate rotation.For rotating the PostgreSQL credentials, type the command
./scripts/credentials set postgresql --autoand press Enter. .For rotating the Elasticsearch credentials, type the command,
./scripts/credentials set elasticsearch --autoand press Enter.
What are Self Signed Certificates?
A self signed certificate is a digital certificate that is not signed by a publicly trusted certificate authority (CA). They are created, issued, and signed by the company or developer who is responsible for the website or software being signed. The private key used in such certificate is not validated by a third party and is generally used in low-risk internal networks or in the software development phase. In addition, unlike CA-issued certificates, self-signed certificates cannot be revoked.
Certificate Creation
You can create a self-signed key and certificate pair with OpenSSL utility, a command line tool for creating and managing OpenSSL certificates, keys, and other files.
Follow these steps to create a self-sign certificate:
Install an openssl utility.
Navigate to your workspace folder. For example,
cd /hab/a2_deploy_workspace.Type the command,
./scripts/credentials set ssl --rotate-all. This command creates a skeleton of certificates.Copy the below bash script to a new file:
# !/bin/bash

echo extendedKeyUsage = clientAuth, serverAuth > server_cert_ext.cnf

echo extendedKeyUsage = clientAuth, serverAuth > client_cert_ext.cnf

openssl genrsa -out ca_root.key 2048

openssl req -x509 -new -key ca_root.key -sha256 -out ca_root.pem -subj '/C=US/ST=Washington/L=Seattle/O=Chef Software Inc/CN=chefrootca'

openssl genrsa -out admin-pkcs12.key 2048

openssl pkcs8 -v1 "PBE-SHA1-3DES" -in "admin-pkcs12.key" -topk8 -out "es_admin_ssl_private.key" -nocrypt

openssl req -new -key es_admin_ssl_private.key -out admin.csr -subj '/C=US/ST=Washington/L=Seattle/O=Chef Software Inc/CN=chefadmin'

openssl x509 -req -in admin.csr -CA ca_root.pem -CAkey ca_root.key -CAcreateserial -out es_admin_ssl_public.pem -sha256 -extfile server_cert_ext.cnf

openssl genrsa -out ssl-pkcs12.key 2048

openssl pkcs8 -v1 "PBE-SHA1-3DES" -in "ssl-pkcs12.key" -topk8 -out  es_ssl_private.key -nocrypt

openssl req -new -key es_ssl_private.key -out ssl.csr -subj '/C=US/ST=Washington/L=Seattle/O=Chef Software Inc/CN=chefnode'

openssl x509 -req -in ssl.csr -CA ca_root.pem -CAkey ca_root.key -CAcreateserial -out es_ssl_public.pem -sha256 -extfile client_cert_ext.cnf

cp ca_root.pem /hab/a2_deploy_workspace/certs/ca_root.pem

cp es_admin_ssl_public.pem /hab/a2_deploy_workspace/certs/es_admin_ssl_public.pem

cp es_admin_ssl_private.key /hab/a2_deploy_workspace/certs/es_admin_ssl_private.key

cp es_ssl_public.pem /hab/a2_deploy_workspace/certs/es_ssl_public.pem

cp es_ssl_private.key /hab/a2_deploy_workspace/certs/es_ssl_private.key

cp es_admin_ssl_private.key /hab/a2_deploy_workspace/certs/kibana_ssl_private.key

cp es_admin_ssl_public.pem /hab/a2_deploy_workspace/certs/kibana_ssl_public.pem

cp es_ssl_private.key /hab/a2_deploy_workspace/certs/pg_ssl_private.key

cp es_ssl_public.pem /hab/a2_deploy_workspace/certs/pg_ssl_public.pem
Navigate to your bastion host.
Execute the new file that has the copied bash script. The script generates the certificates at
/hab/a2_deploy_worspace/certsdirectory. For example,bash cert.sh, where *cert.sh is the name of the newly created bash script file.Again, navigate to your workspace folder. For example,
cd /hab/a2_deploy_workspace.Execute following commands in the same order as listed to apply the generated certificates:
- ./scripts/credentials set ssl –es-ssl
- ./scripts/credentials set ssl –pg-ssl
- ./scripts/credentials set ssl –kibana-ssl
Once the certificates are applied successfully, the following confirmation message appears as shown in the screen:

- Navigate to the Chef Automate and Chef Server instances and check the Chef Service health status. If the service is down or critical, then wait for three to four minutes for the instances to be up.
AWS Certificate Manager
This section explains how to use the AWS Certificate Manager (ACM) console to generate a public ACM certificate to create a Load Balancer (LB).
You can either generate a new public certificate or copy an existing Amazon Resource Name (ARN) value of the certificate of your selected region in the AWS console.
Requesting a Public Certificate using AWS console
Follow these steps if you want to request an ACM public certificate:
Sign in to the AWS Management Console.
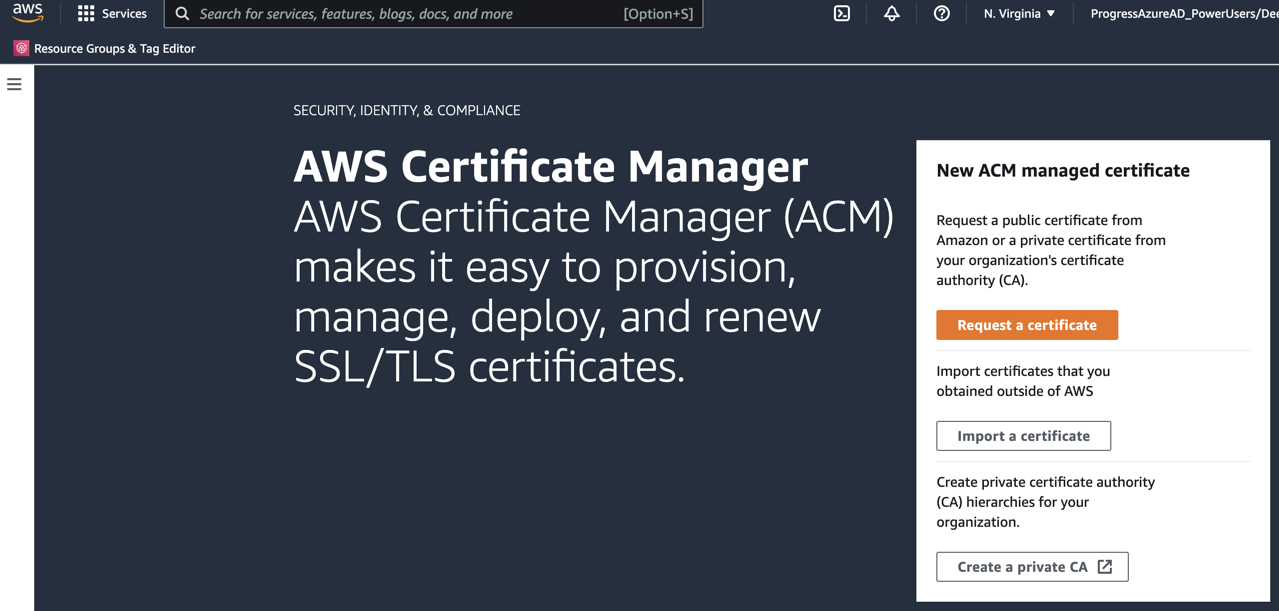
Open the ACM console.
Select your region from the top-right corner of the console.
Select Request a certificate.
Select the Request a public certificate option from the Certificate type page, and select Next.
In the Domain names section, enter your domain name. You can use a fully qualified domain name (FQDN), such as
www.example.com, or a bare domain name such asexample.com.
Before ACM issues a certificate, it validates that you own or control the domain names in your certificate request. You can use either email validation or DNS validation.
In the Select validation method section, select either DNS validation or Email validation.
From the Tags page, you can optionally tag your certificate. Tags are key-value pairs that serve as metadata for identifying and organizing AWS resources.
Select Request. The console returns you to your certificate list after processing the request, where your new certificate displays with status, Pending validation.
You can also request a public certificate using the Command Line Interface (CLI). For detailed information on requesting these certificates, refer AWS documentation on requesting a public certificate.
Providing Certificate ARN Value in a2ha.rb Configuration file
Follow these steps if you want to use the AWS certificates in your network infrastructure:
Log in as a Sudo user by using
su-command.Navigate to the
habworkspace directory.Open the
a2ha.rbfile in any editor of your choice.
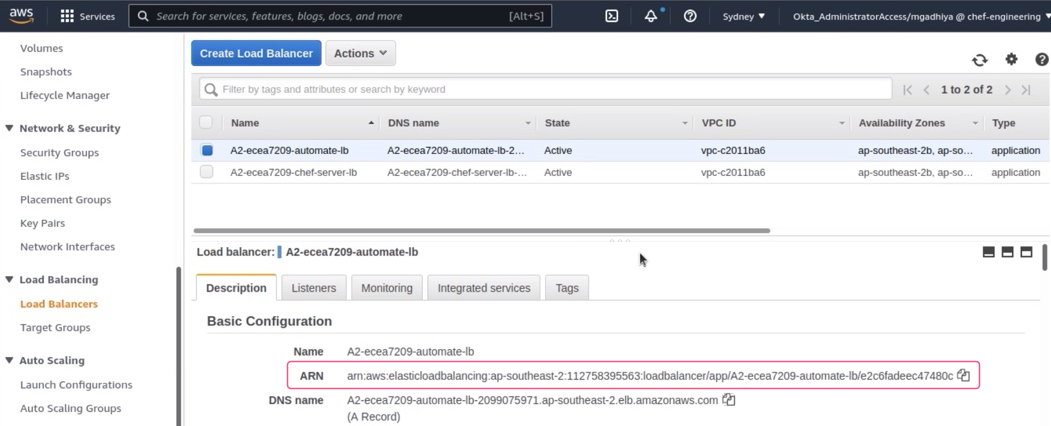
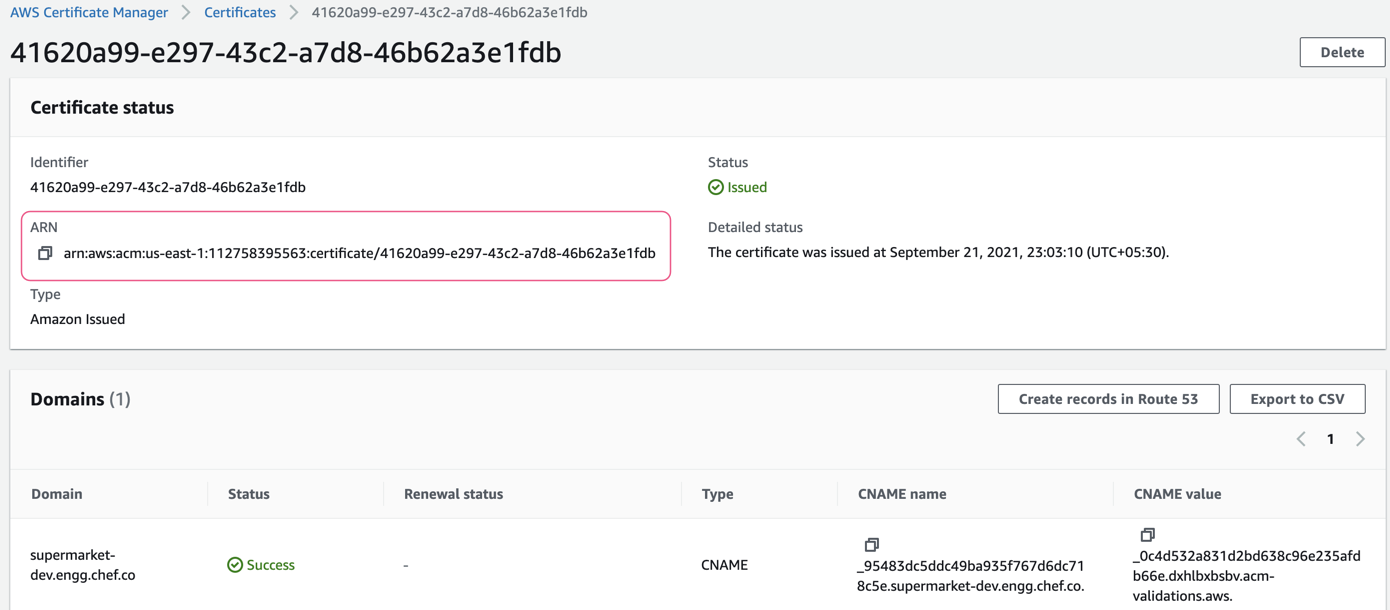
- Copy the existing or generated ARN value from AWS console to the
chef_server_lb_certificate_arnandautomate_server_lb_certificate_arnfields in the a2ha.rb file.

- Save and close the file.
Destroying Chef Automate HA Infrastructure
Follow any of the step to destroy terraform or infrastructure created while deploying Chef Automate High Availability (HA) using AWS or Bare-metal model.
- If the provision-infra command fails, execute the following command to clear the space utilized by this command before it fails, execute the command:
for i in 1;do i=$PWD;cd /hab/a2_deploy_workspace/terraform/;terraform destroy -state=/hab/a2_deploy_workspace/terraform/destroy/aws/terraform.tfstate;cd $i;done
- If the provision-infra command ran successfully and if you want to clear the space utilized by this command, execute these commands in the order listed:
for i in 1;do i=$PWD;cd /hab/a2_deploy_workspace/terraform/destroy/aws/;terraform init;cd $i;done.for i in 1;do i=$PWD;cd /hab/a2_deploy_workspace/terraform/destroy/aws/;terraform destroy;cd $i;done.
- If you have deployed the Chef Automate HA successffuly and wanted to destroy the deployment part alone, execute the command:
for i in 1;do i=$PWD;cd /hab/a2_deploy_workspace/terraform/;terraform destroy;cd $i;done
Note
- If you have deployed the Chef Automate HA successfully and wanted to destroy the entire infrastructure instances, execute these commands:
for i in 1;do i=$PWD;cd /hab/a2_deploy_workspace/terraform/destroy/aws/;terraform init;cd $i;done.
for i in 1;do i=$PWD;cd /hab/a2_deploy_workspace/terraform/destroy/aws/;terraform destroy;cd $i;done.
Validation Commands
This section elaborates the validation procedure that checks the firewall rules and ports before Chef Automate High Availability (HA) backend cluster deployment in your network infrastructure.
Follow these steps to examine the firewall rules are stateful, and ports are open before Chef Automate High Availability (HA) backend cluster deployment in air-gapped environment (means no access to the internet):
Download hab, hab-x86_64-linux.tar.gz by executing the command,
sudo wget https://packages.chef.io/files/stable/habitat/latest/hab-x86_64-linux.tar.gz.Install hab package in your internet environment by executing the following commands that generate netcate package:
sudo tar -xvzf /tmp/hab-x86_64-linux.tar.gz -C /usr/local/bin --strip-components 1

export HAB_LICENSE=accept-no-persist

hab pkg install core/netcat -bf

ls -dtr1 /hab/cache/artifacts/core-netcat-*
- Provide the path of the
config.tomlfile,hab-utitlityandnetcatepackage in the command, ./chef-automate validate-ha-infrastructure /path/to/config.toml /path/to/hab.tar.gz /path/to/netcat.hart as parameters.
./chef-automate validate-ha-infrastructure /root/config.toml /root/hab-x86_64-linux.tar.gz /hab/cache/artifact/core-netcat-<version>.hart
This command show the status of the set firewall rules and the ports configured.
Validation Procedure for Airgap Environment
You need to execute the following command to examine the firewall rules are stateful, and ports are open before Chef Automate High Availability (HA) backend cluster deployment in your network environment which has access to the internet:
./chef-automate validate-ha-infrastructure /path/to/config.toml
where you need to provide the path of the config.toml file in /path/to/config.toml in the above command.
This command show the status of the set firewall rules and the ports configured.
Understanding VPC
Amazon VPC, a virtual network dedicated to your AWS account, enables you to launch AWS resources into a virtual network. This virtual network resembles a traditional network that you had to operate in your own data center, with the benefits of using the scalable infrastructure of AWS.
Amazon VPC is the networking layer for Amazon EC2. Amazon Elastic Compute Cloud (Amazon EC2) provides scalable computing capacity in the Amazon Web Services (AWS) Cloud. Using Amazon EC2 eliminates your need to invest in hardware upfront, so you can develop and deploy applications faster. You can use Amazon EC2 to launch as many or as few virtual servers as you need, configure security and networking, and manage storage. Amazon EC2 enables you to scale up or down to handle changes in requirements or spikes in popularity, reducing your need to forecast traffic.
VPC creates an isolated virtual network environment in the AWS cloud, dedicated to your AWS account. Other AWS resources and services operate inside VPC networks to provide cloud services. AWS VPC looks familiar to anyone running a physical Data Center (DC). A VPC behaves like a traditional TCP/IP network that can be expanded and scaled as needed. However, the DC components you are used to dealing with—such as routers, switches, and VLANS—do not explicitly exist in a VPC. They have been abstracted and re-engineered into cloud software.
All VPCs are created and exist in one–and only one–AWS region. AWS regions are geographic locations where Amazon clusters its cloud data centers. The advantage of regionalization is that a regional VPC provides network services originating from that geographical area. If you need to provide closer access for customers in another region, you can set up another VPC in that region. This aligns nicely with the theory of AWS cloud computing, where IT applications and resources are delivered through the internet on-demand and with pay-as-you-go pricing. Limiting VPC configurations to specific regions allows you to selectively provide network services where they are needed, as they are needed.
Each Amazon account can host multiple VPCs. Because VPCs are isolated, you can duplicate private subnets among VPCs the same way you could use the same subnet in two different physical data centers. You can also add public IP addresses that can be used to reach VPC-launched instances from the internet.
You can modify or use that VPC for your cloud configurations, or you can build a new VPC and support services from scratch. However, no VPCs can communicate directly.
VPC Setup
You can either create a new VPC or use an existing available one in the region where you are setting up the Chef Automate HA infrastructure.
VPC Limit
The default limit to create a VPC in a region is 5. However, if the VPCs used in the respective region are exhausted, you can increase the limit in your AWS account. Chef Automate HA on AWS deployment creates two VPCs, one for the bastion host and another for the rest of the node in a cluster.
Note
AWS limits the size of each VPC; a user cannot change the size once the VPC has been created. Amazon VPC also sets a limit of 200 subnets per VPC, each of which can support a minimum of 14 IP addresses. AWS places further limitations per account / per region, including limiting the number of VPCs to five, the number of Elastic IP addresses to five, the number of Internet gateways per VPC to one, the number of virtual private gateways to five, and the number of customer gateways to 50.
VPC IP address ranges are defined using Classless interdomain routing (CIDR) IPv4 and IPv6 blocks. You can add primary and secondary CIDR blocks to your VPC, if the secondary CIDR block comes from the same address range as the primary block.
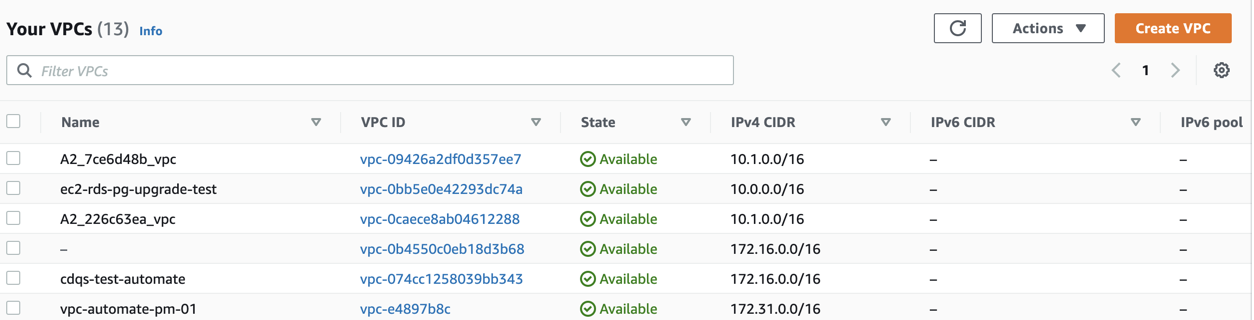
Copying an Existing VPC
Navigate to the AWS Management Console.
Select your AWS Region from the top toolbar.
From the navigation pane, select VPC Dashboard in the upper-left corner.
Select Your VPCs.
Copy any available VPC ID from the Your VPCs screen.
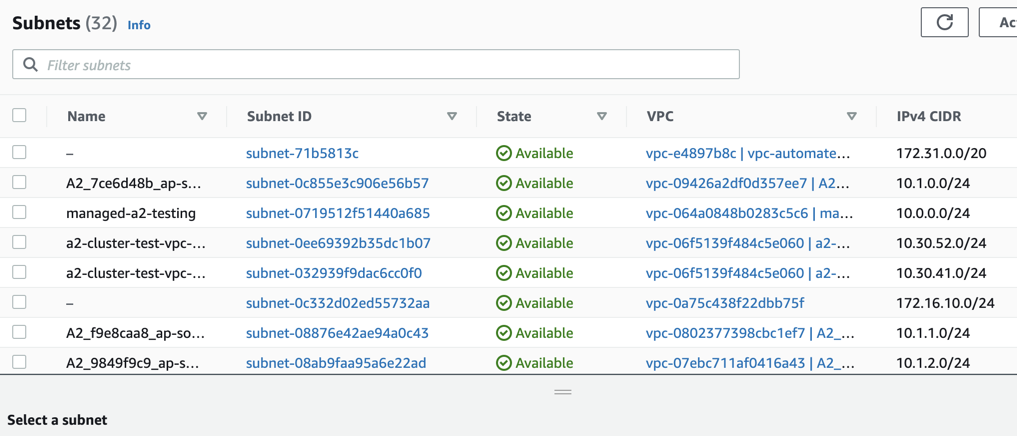
Adding a Private Subnet to the Available VPC
From the navigation pane, select Subnets.
Search your VPC ID in the Subnets screen.
Copy the corresponding IPv4 CIDR value.
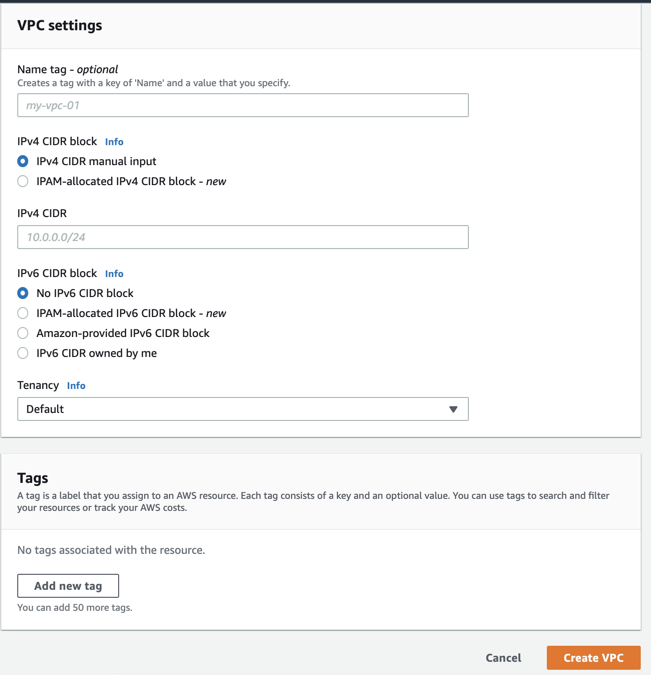
Creating a VPC
Navigate to the AWS Management Console.
Select your AWS Region from the top toolbar.
From the navigation pane, select VPC Dashboard in the upper-left corner.
Select Your VPCs.
Select Create VPC from the left.
For IPv4 CIDR block, enter the CIDR block for the VPC. We recommend that you use a CIDR block from the private (non-publicly routable) IP address ranges. For example, 10.0.0.0/16. For more information, refer VPC and Subnet Sizing for IPv4 page.
For IPv6 CIDR block, keep No IPv6 CIDR Block.
For VPC name, enter a tag name.
Select Create VPC. After the VPC is created, choose OK.
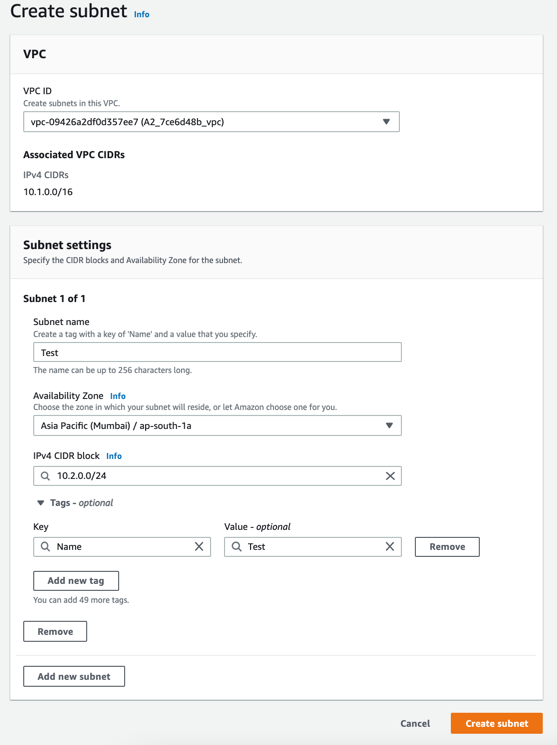
Adding a Private Subnet
From the navigation pane, select Subnets.
Select Create Subnet.
Select your VPC ID from the drop-down.
Enter Subnet name for the private subnet (for example, WorkSpaces Private Subnet 2).
To make an appropriate selection for Availability Zone, see Availability Zones for Amazon WorkSpaces.
Enter the CIDR block for the subnet in the IPv4 CIDR block. For example, 10.0.2.0/24. Ensure you provide a unique value.
Select Create Subnet.
Note
Understanding CIDR
We need to understand IPv4 addresses/ notation to understand CIDR blocks. For eg, 10.10.101.5, might be the address of the database, and it’s a 32-bit binary number. So, the 10 maps to the first octet of the 0001010, another octet for the second 10, a third octet, fourth octet, each one ranging from 0 to 255 as far as our numbers. We are not describing a single number and describing a range of numbers, all the possible IP addresses that begin with the numbers 10.10. So, to describe a number, a range of numbers, that begin 10.10 using CIDR notation. CIDR stands for Classless Inter-Domain Routing, a 32 -bit number underlying the octets.
In this case, we are freezing the first 16 bits, and wild card the rest, so we draw out the number as 10.10, meaning these are the numbers that are going to stay the same. It doesn’t matter commonly we’ll put zeros here. And then, after the slash, announced how many bits are frozen, so 10.10.0.0. whatever/16 indicates, in this case, the first 2 octets never change, the last 2 can be whatever you want. Inside a notation is then simply determining how many bits are you freezing. The rest are all being wild carded in IPv4 notation.
/16 is the most common number we’ll see for a VPC CIDR block. It’s also the most you’re allowed to do. You certainly could go smaller than /16, and smaller being 17, 18, 19, and so on in this case, and you can go as small as /28, but that’s only going to give you a possible 12 addresses, 16 addresses minus the ones we take away, that’s going to be for use inside your VPC, whereas a /16 is going to give you about 65,000 possible addresses.
If /16 is my CIDR block for your main VPC, we then subdivide into subnets, which need to be a subset of the /16, so they all need to start at least with a 10.10, but if I want multiple subnets, I then don’t want any collisions, commonly we’ll see those as /24. What a /24 means, means I’m freezing the first 24 bits. So say I want the subnet where my database lives, so we call that out as 10.10.101. who cares /24, which means for this subnet, if I’m defining it as a /24, I could have any private IP address beginning from 0 up to 255. In other words, wildcard the last 8 bits.
A /32 is a single specific address. In this case, 10.10.101.5, not wildcarding anything. This is only one IP address used to authorize in a security group traffic. Likewise, if you want to authorize traffic from the entire internet, wild card everything. So 000/0 becomes the final notation to the front-end web servers or other elements.
Example config.toml file with VPC and CIDR Values
region = "ap-south-1"
aws_vpc_id  = "vpc-8d1390e5"
aws_cidr_block_addr  = "172.31.128.0"
Was this page helpful?