About Chef InSpec Profiles
Chef InSpec supports the creation of complex test and compliance profiles, which organize controls to support dependency management and code reuse. Each profile is a standalone structure with its own distribution and execution flow.
Profile Structure
A profile should have the following structure:
examples/profile
├── README.md
├── controls
│   ├── example.rb
│   └── control_etc.rb
├── libraries
│   └── extension.rb
|── files
│   └── extras.conf
└── inspec.yml
where:
inspec.ymlincludes the profile description (required)controlsis the directory in which all tests are located (required)librariesis the directory in which all Chef InSpec resource extensions are located (optional)filesis the directory with additional files that a profile can access (optional)README.mdshould be used to explain the profile, its scope, and usage
See a complete example profile in the Chef InSpec open source repository: Example Chef InSpec Profile
Also check out Explore Chef InSpec resources on Learn Chef Rally to learn more about how profiles are structured with hands-on-examples.
inspec.yml
Each profile must have an inspec.yml file that defines the following information:
- Use
nameto specify a unique name for the profile. Required. - Use
titleto specify a human-readable name for the profile. - Use
maintainerto specify the profile maintainer. - Use
copyrightto specify the copyright holder. - Use
copyright_emailto specify support contact information for the profile, typically an email address. - Use
licenseto specify the license for the profile. - Use
summaryto specify a one line summary for the profile. - Use
descriptionto specify a multiple line description of the profile. - Use
versionto specify the profile version. - Use
inspec_versionto place SemVer constraints on the version of Chef InSpec that the profile can run under. - Use
supportsto specify a list of supported platform targets. - Use
dependsto define a list of profiles on which this profile depends. - Use
inputsto define a list of inputs you can use in your controls. - Use
gem_dependenciesto specify a list of profile gem dependencies that is required to be installed for the profile to function correctly.
name is required; all other profile settings are optional. For example:
name: ssh
title: Basic SSH
maintainer: Chef Software, Inc.
copyright: Chef Software, Inc.
copyright_email: support@chef.io
license: Proprietary, All rights reserved
summary: Verify that SSH Server and SSH Client are configured securely
version: 1.0.0
supports:
  - platform-family: linux
depends:
  - name: profile
    path: ../path/to/profile
gem_dependencies:
  - name: "gem-name"
    version: ">= 2.0.0"
inspec_version: "~> 2.1"
The inspec.yml also supports embedded ERB in the file. For example:
name: dummy
title: InSpec Profile
maintainer: The Authors
copyright: The Authors
copyright_email: you@example.com
license: Apache-2.0
summary: An InSpec Compliance Profile
version: 0.1.0
depends:
- name: inherit
  url: "https://artifactory.com/artifactory/example-repo-local/inspec/0.4.1.tar.gz"
  username: <%= ENV['USERNAME'] %>
  password: <%= ENV['API_KEY'] %>
Verify Profiles
Use the inspec check command to verify the implementation of a profile:
inspec check examples/profile
Platform Support
Use the supports setting in the inspec.yml file to specify one (or more) platforms for which a profile is targeting. The list of supported platforms may contain the following:
- Use
platform-familyto restrict to a specific platform family. - Use
platform-nameto restrict on a specific platform name.platform-namesupports asterisk (*) wildcard use. - Use
releaseto restrict to a specific platform version, and use together withplatform-name.releasesupports asterisk (*) wildcard use. - Use
platformto restrict on either platform-name or platform-family.
For compatibility we support os-name and os-family. We recommend all users
to change os-name to platform-name and os-family to platform-family.
With Chef InSpec 2.0, we introduced new families to help distinguish the cloud
platforms. The new families can restrict the platform family to os, aws, azure or gcp.
For example, to target anything running Debian Linux, use:
name: ssh
supports:
  - platform-name: debian
To target only Ubuntu version 20.04, use:
name: ssh
supports:
  - platform-name: ubuntu
    release: 20.04
To target the entire release of Ubuntu version 20.x, use:
name: ssh
supports:
  - platform-name: ubuntu
    release: 20.*
To target the Red Hat and derivative platforms such as CentOS and Oracle Linux, use:
name: ssh
supports:
  - platform-family: redhat
To target the entire Windows 2019 platform family, including Datacenter and Core Servers, use:
name: ssh
supports:
  - platform-name: windows_server_2019*
To target anything running on Amazon AWS, use:
name: ssh
supports:
  - platform: aws
To target all of these examples in a single inspec.yml file, use:
name: ssh
supports:
  - platform-name: debian
  - platform-name: ubuntu
    release: 20.04
  - platform-family: redhat
  - platform: aws
Profile Dependencies
A Chef InSpec profile can bring in the controls and custom resources from another Chef InSpec profile. Additionally, when inheriting the controls of another profile, a profile can skip or even modify those included controls.
For hands-on examples, check out Create a custom Chef InSpec profile on Learn Chef Rally.
Defining the Dependencies
Before a profile can use controls from another profile, the to-be-included profile
needs to be specified in the including profile’s inspec.yml file in the depends
section. For each profile to be included, a location for the profile from where
to be fetched and a name for the profile should be included. For example:
depends:
- name: linux-baseline
  url: https://github.com/dev-sec/linux-baseline/archive/master.tar.gz
- name: ssh-baseline
  url: https://github.com/dev-sec/ssh-baseline/archive/master.tar.gz
Chef InSpec supports a number of dependency sources.
path
The path setting defines a profile that is located on disk. This setting is
typically used during development of profiles and when debugging profiles.
depends:
- name: my-profile
  path: /absolute/path
- name: another
  path: ../relative/path
url
The url setting specifies a profile that is located at an HTTP- or HTTPS-based
URL. The profile must be accessible via a HTTP GET operation and must be a valid
profile archive (zip, tar, or tar.gz format).
depends:
- name: my-profile
  url: https://my.domain/path/to/profile.tgz
- name: profile-via-git
  url: https://github.com/myusername/myprofile-repo/archive/master.tar.gz
url also supports basic authentication.
depends:
- name: my-profile
  url: https://my.domain/path/to/profile.tgz
  username: user
  password: password
git
A git setting specifies a profile that is located in a git repository, with
optional settings for branch, tag, commit, version, and relative_path. The source
location is translated into a URL upon resolution. This type of dependency supports
version constraints via semantic versioning as git tags.
depends:
- name: git-profile
  git: http://url/to/repo
  branch:  desired_branch
  tag:     desired_version
  commit:  pinned_commit
  version: semver_via_tags
  relative_path: relative/optional/path/to/profile
supermarket
A supermarket setting specifies a profile that is located in a cookbook hosted
on Chef Supermarket. The source location is translated into a URL upon resolution.
For example:
depends:
- name: supermarket-profile
  supermarket: supermarket-username/supermarket-profile
Available Supermarket profiles can be listed with inspec supermarket profiles.
compliance
A compliance setting specifies a profile that is located on the Chef Automate
or Chef Compliance server.
For example:
depends:
- name: linux
  compliance: base/linux
Gem Dependencies
Any profile with ruby gem dependencies that need to be installed can be specified using the gem_dependencies settings in the inspec.yml metadata file.
For example, if you required any ruby library in a custom resource that needs a specific gem to be installed, then you can specify those gems in the metadata file. Chef InSpec will prompt to install the gems to ~/.inspec/gems when you run your profile the first time. To skip the prompt and automatically install, pass the --auto-install-gems option to inspec exec.
gem_dependencies:
  - name: "mongo"
    version: ">= 2.3.12"
Vendoring Dependencies
When you execute a local profile, the inspec.yml file will be read in order to
source any profile dependencies. It will then cache the dependencies locally and
generate an inspec.lock file.
If you add or update dependencies in inspec.yml, dependencies may be re-vendored
and the lockfile updated with inspec vendor --overwrite
Using Controls from an Included Profile
Once defined in the inspec.yml, controls from the included profiles can be used!
Let’s look at some examples.
Including All Controls from a Profile
With the include_controls command in a profile, all controls from the named
profile will be executed every time the including profile is executed.
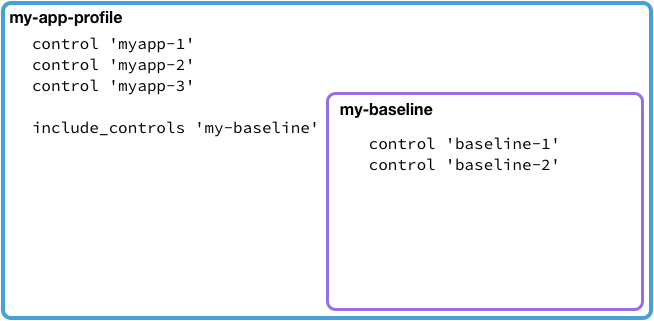
In the example above, every time my-app-profile is executed, all the controls
from my-baseline are also executed. Therefore, the following controls would be
executed:
- myapp-1
- myapp-2
- myapp-3
- baseline-1
- baseline-2
This is a great reminder that having a good naming convention for your controls is helpful to avoid confusion when including controls from other profiles!
Skipping a Control from a Profile
What if one of the controls from the included profile does not apply to your
environment? Luckily, it is not necessary to maintain a slightly-modified copy
of the included profile just to delete a control. The skip_control command
tells Chef InSpec to not run a particular control.
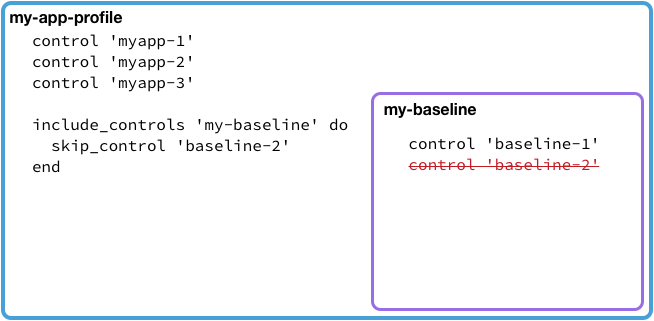
In the above example, all controls from my-app-profile and my-baseline profile will be executed every time my-app-profile is executed except for control baseline-2 from the my-baseline profile.
Modifying a Control
Let’s say a particular control from an included profile should still be run, but the impact isn’t appropriate? Perhaps the test should still run, but if it fails, it should be treated as low severity instead of high severity?
When a control is included, it can also be modified!
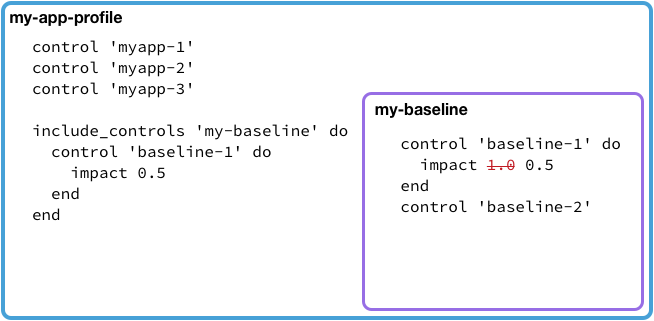
In the above example, all controls from my-baseline are executed along with
all the controls from the including profile, my-app-profile. However, should
control baseline-1 fail, it will be raised with an impact of 0.5 instead of
the originally-intended impact of 1.0.
Selectively Including Controls from a Profile
If there are only a handful of controls that should be executed from an included
profile, it’s not necessarily to skip all the unneeded controls, or worse,
copy/paste those controls bit-for-bit into your profile. Instead, use the
require_controls command.
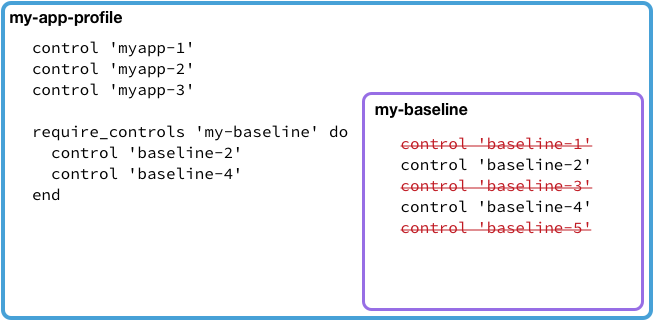
Whenever my-app-profile is executed, in addition to its own controls, it will
run only the controls specified in the require_controls block. In the case, the
following controls would be executed:
- myapp-1
- myapp-2
- myapp-3
- baseline-2
- baseline-4
Controls baseline-1, baseline-3, and baseline-5 would not be run, just as
if they were manually skipped. This method of including specific controls ensures
only the controls specified are executed; if new controls are added to a later
version of my-baseline, they would not be run.
And, just the way its possible to modify controls when using include_controls,
controls can be modified as well.
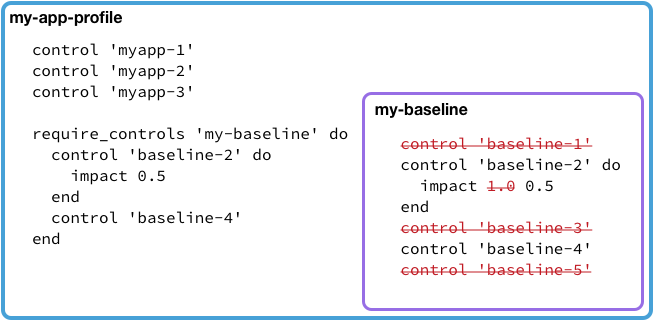
As with the prior example, only baseline-2 and baseline-4 are executed, but
if baseline-2 fails, it will report with an impact of 0.5 instead of the
originally-intended 1.0 impact.
Using Resources from an Included Profile
By default, all of the custom resources from a listed dependency are available
for use in your profile. If two of your dependencies provide a resource with
the same name, you can use the require_resource DSL function to
disambiguate the two:
require_resource(profile: 'my_dep', resource: 'my_res',
                  as: 'my_res2')
This will allow you to reference the resource my_res from the
profile my_dep using the name my_res2.
Profile Inputs
Our documentation regarding Inputs is now on a dedicated page.
Profile files
A Chef InSpec profile may contain additional files that can be accessed during tests. A profile file enables you to separate the logic of your tests from the data your tests check for, for example, the list of ports you require to be open.
To access these files, they must be stored in the files directory at the root
of a profile. They are accessed by their name relative to this folder with
inspec.profile.file(...).
Here is an example for reading and testing a list of ports. The folder structure is:
examples/profile
├── controls
│   ├── example.rb
│── files
│   └── services.yml
└── inspec.yml
With services.yml containing:
- service_name: httpd-alpha
  port: 80
- service_name: httpd-beta
  port: 8080
The tests in example.rb can now access this file:
my_services = yaml(content: inspec.profile.file('services.yml')).params

my_services.each do |s|
  describe service(s['service_name']) do
    it { should be_running }
end

describe port(s['port']) do
  it { should be_listening }
  end
end
For a more complete example that uses a profile file, see Explore Chef InSpec resources on Learn Chef Rally.
“should” vs. “expect” syntax
Users familiar with the RSpec testing framework may know that there are two ways
to write test statements: should and expect. The RSpec community decided that
expect is the preferred syntax. However, Chef InSpec recommends the should
syntax as it tends to read more easily to those users who are not as technical.
Chef InSpec will continue to support both methods of writing tests. Consider
this file test:
describe file('/tmp/test.txt') do
  it { should be_file }
end
This can be re-written with expect syntax
describe file('/tmp/test.txt') do
  it 'should be a file' do
    expect(subject).to(be_file)
  end
end
The output of both of the above examples looks like this:
File /tmp/test.txt
   ✔  should be a file
In addition, you can make use of the subject keyword to further control your
output if you choose:
describe 'test file' do
  subject { file('/tmp/test.txt') }
  it 'should be a file' do
    expect(subject).to(be_file)
  end
end
… which will render the following output:
test file
  ✔  should be a file
Was this page helpful?